Hexagonal Architecture (Ports and Adapters): Building Testable Systems (2025)
In standard software development, it is all too common to fall into the trap of Database-Driven Design. The process usually starts with creating tables, followed by models to wrap those tables, and finally controllers to manipulate them.
The inevitable result is Coupling. Your critical business logic becomes inextricably linked to a specific SQL dialect, database vendor, or external API.
- Want to swap the database? You have to rewrite the application.
- Want to unit test the order processing logic? You have to spin up a Docker container.
Hexagonal Architecture, also known as Ports and Adapters, inverts this relationship. It places your Business Logic at the center of the universe, treating the database, user interface, and external APIs as interchangeable implementation details on the periphery.
In this guide, we will implement a robust, testable TypeScript application using this pattern, demonstrating why it remains the gold standard for long-lived, maintainable software.
Part 1: The Problem with Layers
1.1 The "MVC" Trap
In traditional Layered Architecture (Presentation -> Domain -> Data), dependencies point down.
- The Controller imports the Service.
- The Service imports the Repository.
- The Repository imports the ORM.
This means The Database is the Foundation. If you change your database schema, the breakage ripples up: Repository breaks -> Service breaks -> Controller breaks. Your core business rules (The "Service") are fragile because they depend on technical details (The "Data").
1.2 The Dependency Inversion Principle (DIP)
Hexagonal Architecture applies the "D" in SOLID. High-level modules should not depend on low-level modules. Both should depend on abstractions.
Instead of the Service depending on the Repository Class, the Service defines an Interface (Port) that it needs. The Repository implements that Interface. The dependency arrow is inverted. The core logic stands alone.
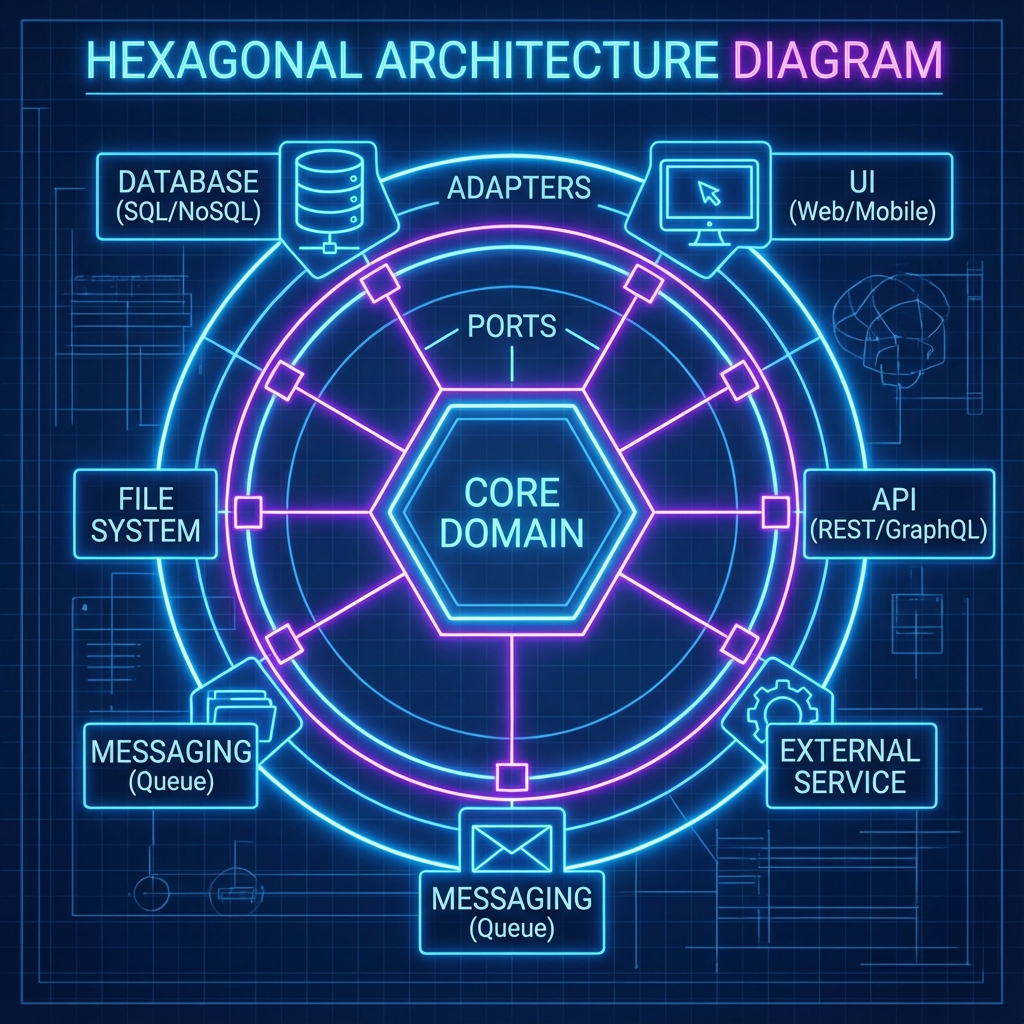
Part 2: The Hexagon Anatomy
Imagine a Hexagon.
2.1 The Inside (The Domain)
This is the holy grail. It contains:
- Entities: Pure objects (e.g.,
User,Order). No annotations (@Entity), no ORM logic. Just pure TypeScript/Java/Go classes. - Use Cases (Interactors): The actions (
CreateOrder,CancelSubscription).
Rule: The Inside knows nothing about the Outside. It doesn't know HTTP exists. It doesn't know SQL exists.
2.2 The Ports (The API)
These are Interfaces that live on the boundary of the hexagon. There are two types:
- Driving Ports (Primary): "How do I tell the app to do something?"
- Example:
IOrderServiceinterface.
- Example:
- Driven Ports (Secondary): "What does the app need from the outside world?"
- Example:
IOrderRepositoryinterface,IEmailSenderinterface.
- Example:
2.3 The Adapters (The Implementation)
These live outside the hexagon. They glue the real world to the ports.
- Driving Adapters: Connect users to the Driving Ports.
- REST Controller (Express/NestJS)
- CLI Command
- GraphQL Resolver
- Driven Adapters: Implement the Driven Ports.
- Postgres Repository
- Mailgun Email Service
- Mock Repository (for testing)
Part 3: Implementation in TypeScript
Let's build a simple "Course Registration" system.
Step 1: The Domain Entity (Inside)
Note: No database types here. Just logic.
// src/domain/Course.ts
export class Course {
  constructor(
    public readonly id: string,
    public readonly title: string,
    public readonly capacity: number,
    private _students: string[] = []
  ) {}

  registerStudent(studentId: string) {
    if (this._students.length >= this.capacity) {
      throw new Error("Course is full");
    }
    if (this._students.includes(studentId)) {
      throw new Error("Student already registered");
    }
    this._students.push(studentId);
  }

  get students() {
    return [...this._students];
  }
}
Step 2: The Driven Ports (Interfaces)
What does the business logic need? Ideally, a way to save courses.
// src/ports/CourseRepository.ts
import { Course } from "../domain/Course";

export interface CourseRepository {
  save(course: Course): Promise<void>;
  findById(id: string): Promise<Course | null>;
}
Step 3: The Use Case (Application Logic)
This implements the business flow. Notice it asks for CourseRepository in the constructor. It doesn't care which repository.
// src/use-cases/RegisterStudent.ts
import { CourseRepository } from "../ports/CourseRepository";

export class RegisterStudent {
  constructor(private readonly repo: CourseRepository) {}

  async execute(courseId: string, studentId: string) {
    // 1. Fetch
    const course = await this.repo.findById(courseId);
    if (!course) throw new Error("Course not found");

    // 2. Mutate (Domain Logic)
    course.registerStudent(studentId);

    // 3. Save
    await this.repo.save(course);
  }
}
Step 4: The Driven Adapter (Infrastructure)
Now we actually implement Postgres.
// src/adapters/PostgresCourseRepository.ts
import { CourseRepository } from "../ports/CourseRepository";
import { Course } from "../domain/Course";
import { db } from "./db"; // hypothetical db connection

export class PostgresCourseRepository implements CourseRepository {
  async findById(id: string): Promise<Course | null> {
    const row = await db.query("SELECT * FROM courses WHERE id = $1", [id]);
    if (!row) return null;
    // Map DB row to Domain Entity
    return new Course(row.id, row.title, row.capacity, row.student_ids);
  }

  async save(course: Course): Promise<void> {
    await db.query("UPDATE courses SET student_ids = $1 WHERE id = $2", [
      course.students,
      course.id,
    ]);
  }
}
Step 5: The Driving Adapter (Controller)
Connect HTTP to the Use Case.
// src/adapters/CourseController.ts
import { Request, Response } from "express";
import { RegisterStudent } from "../use-cases/RegisterStudent";

export class CourseController {
  constructor(private readonly useCase: RegisterStudent) {}

  async register(req: Request, res: Response) {
    try {
      await this.useCase.execute(req.params.courseId, req.body.studentId);
      res.status(200).send({ message: "Success" });
    } catch (e) {
      res.status(400).send({ error: e.message });
    }
  }
}
Step 6: Wiring It Up (Dependency Injection)
This usually happens in main.ts.
// src/main.ts
const repo = new PostgresCourseRepository(); // Swap this for MongoCourseRepository easily
const useCase = new RegisterStudent(repo);
const controller = new CourseController(useCase);

app.post("/courses/:courseId/register", (req, res) =>
  controller.register(req, res)
);
Part 4: The Testing Miracle
Why did we do all this boilerplating? Testing.
How do we test RegisterStudent logic? We don't need Postgres.
// tests/RegisterStudent.test.ts
import { RegisterStudent } from "../src/use-cases/RegisterStudent";
import { Course } from "../src/domain/Course";

// Create a Fake Adapter (In-Memory)
class MockRepo implements CourseRepository {
  private courses: Course[] = [];
  async save(c: Course) {
    this.courses.push(c);
  }
  async findById(id: string) {
    return this.courses.find((c) => c.id === id) || null;
  }
}

test("should register student successfully", async () => {
  const repo = new MockRepo();
  const course = new Course("c1", "Math", 10);
  await repo.save(course);

  const useCase = new RegisterStudent(repo);
  await useCase.execute("c1", "student1");

  const updated = await repo.findById("c1");
  expect(updated.students).toContain("student1");
});
This test runs in milliseconds. No database setup. No Docker. No latency. You can test 100% of your business logic instantly.
Part 5: Hexagonal vs Clean vs Onion
You will hear these terms used interchangeably.
- Hexagonal Architecture (2005): Focuses on Ports and Adapters. Visualizes interfaces as edges of a polygon.
- Onion Architecture (2008): Adds concentric layers. Domain Model -> Domain Services -> Application Services -> UI/Infra.
- Clean Architecture (2012): Uncle Bob's synthesis. Standardized the terms "Entities", "Use Cases", "Interface Adapters".
They are 99% the same thing. The core principle is universal: Dependencies point inward.
Part 6: When NOT to use it
Hexagonal Architecture is complex. It requires more files, more interfaces, and more mapping (mapping DB rows to API objects to Domain entities).
Do NOT use it if:
- You are building a simple CRUD app. If your app just reads a table and shows it, this is over-engineering.
- You are "prototyping". Speed matters more than decoupling.
- Your team is junior and struggles with abstraction.
Use it if:
- The business logic is complex and changes often.
- The app will live for 5+ years.
- You need high test coverage.
- You might change infrastructure (e.g., move from REST to gRPC, or SQL to NoSQL).
Conclusion: Separation of Concerns
Hexagonal Architecture is not just code organization; it is a philosophy. It treats frameworks (React, NestJS, Spring Boot) as tools, not masters. It treats databases as buckets, not brains.
By isolating your core domain, you protect your business's most valuable asset—its rules and logic—from the chaos of the changing tech landscape.
Implementation Checklist
- Define Core Entities: No frameworks allowed.
- Define Use Cases: Verbs describing what the system does.
- Define Repository Interfaces: What data do we need?
- Implement Adapters: Write the SQL/HTTP code last.
- Inject Dependencies: Glue it together at the entry point.